
Using Artificial Intelligence to set a guitar sound
Introduction
A lot of tools have appeared for sound creation since the recent developments in artificial intelligence. In this presentation, I will show how to create a sound using NAM files and some plugins available in Guitarix.
To manage guitar sound, today, we have several supported formats: AIDA-X [1], [19], [20], NAM and RTNeural. Guitarix [6] proposes a module to be able to use NAM or RTNeural amplifier models.
If someone prefers to use the AIDA-X plugin, it’s still possible to add this plugin into Guitarix. This plugin is available in the Audinux COPR repository and also in the MOD effect pedal [18].
The version of Guitarix we will use is the one from the Audinux COPR repository (see [10] and [11]) where you will find some other AI oriented plugins, too.
To be able to use Guitarix in real time to process the sound of your guitar (with a latency below 10 ms), some steps are required:
- Add ‘preempt=full threadirqs‘ as options on the kernel command line (via grub just before booting a kernel). Check [22] for how to set up kernel options
- In the file /etc/security/limits.d/25-pw-rlimits.conf (you must be a super user to be able to edit this file), replace the line “@pipewire – rtprio …” by “@pipewire – rtprio 95“
- Add your user to the pipewire group. As a super user, enter the command “usermod -a -G pipewire <USERNAME>“
- Disconnect from your current window manager session and re-login to your session (so the last two steps take effect)
Now, you are ready to use Guitarix in real-time mode.
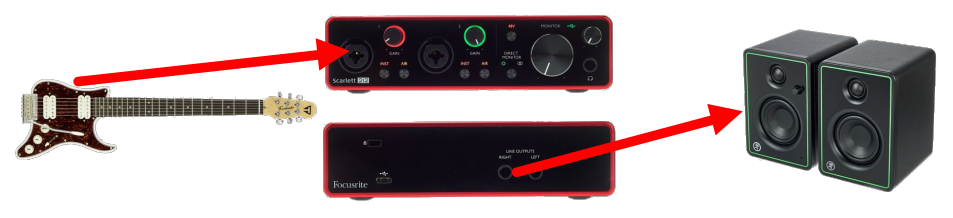
Connect your guitar to the input of your USB audio interface and your monitoring speakers to the output of your USB audio interface and that’s all.
The remainder of this article will be software manipulations.
Guitarix: guitarist’s tools of the trade
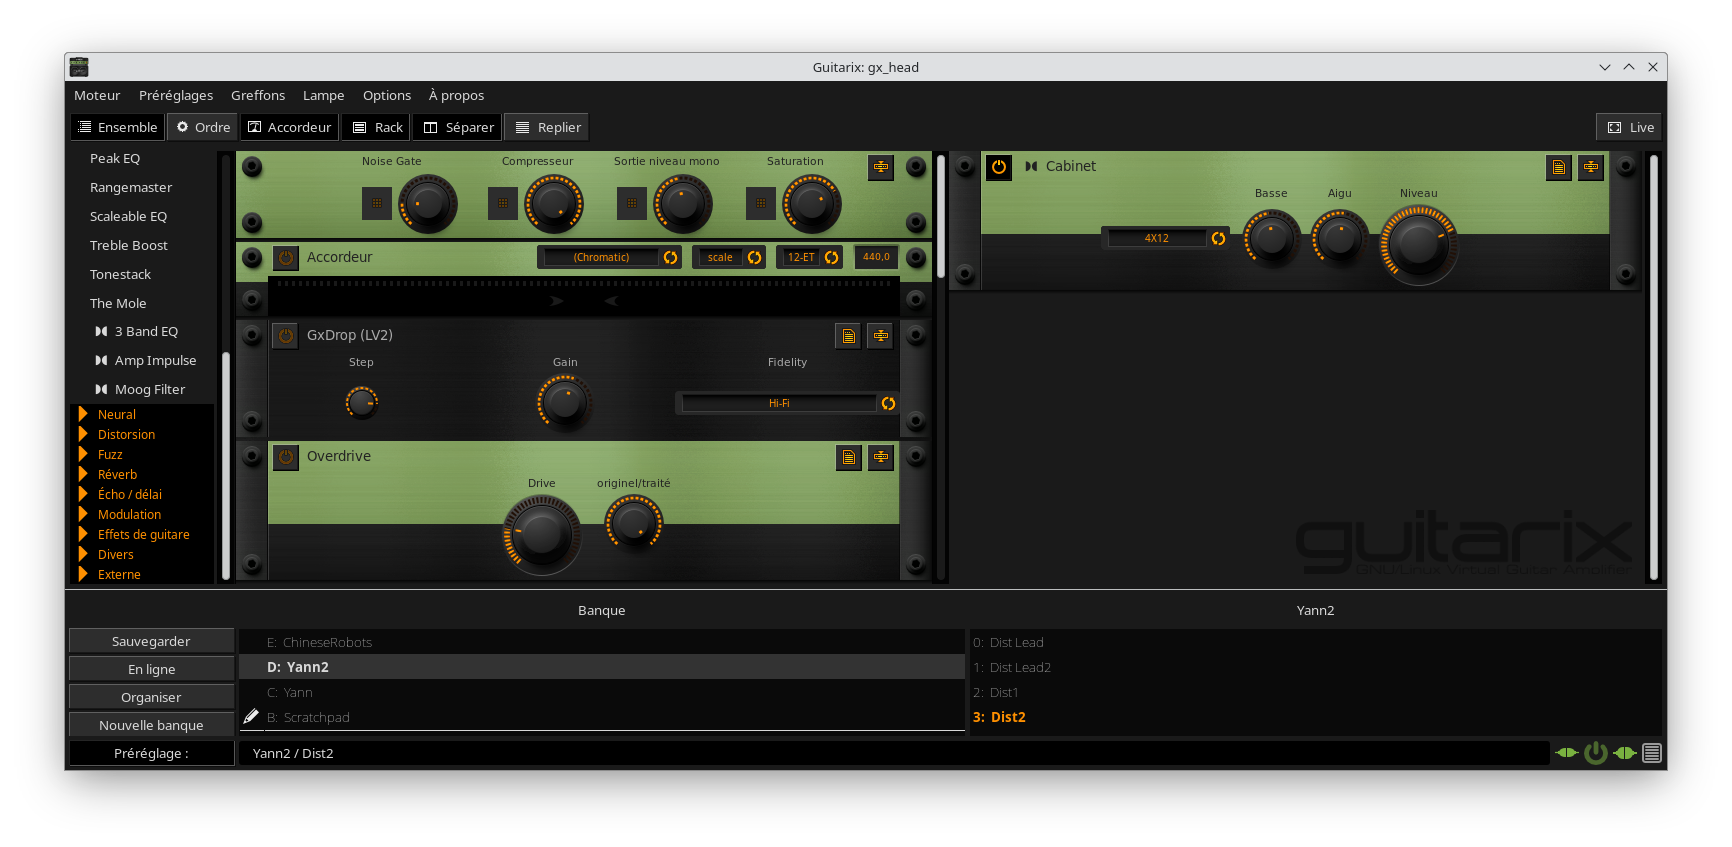
Guitarix’s first commit dates back to November 2008. Today, with version 0.46.0, various plugins have been added. There is also a really good tube simulation module. All these are integrated into a main window. Guitarix also has a great tool which allows the translation of electronics schematics into LV2 plugins (only available in the Git repository). For example, the Tube Screamer plugin is a direct conversion of the Tube Screamer schematics into a LV2 plugin.
Guitarix exists also in a VST3 version [15].
On the screenshot above, you can see a plugin navigator on the left, a preset management section below and an area where plugins may be dropped. On the left of that area you have the mono plugins and on the right, you have the stereo plugins.
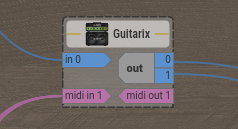
Guitarix is represented as this rectangular block in Ray Session [7]. The blue connectors are related to the audio signal (one mono input and one stereo output) and the pink connectors are related to the MIDI signal. There is one MIDI input which allows connection to a MIDI pedal board and switch presets or to control some plugins like the wah wah plugin. When you click on a mouse center button on a Guitarix GUI element, a MIDI learn window pops up and allows you to define an association between MIDI event and the GUI element. There is also one MIDI output which is a MIDI through and which also handles a MIDI note generated by the Guitarix audio tuner.
Guitarix works with Jack and works fine with Pipewire Jack too.
Defining a standard sound
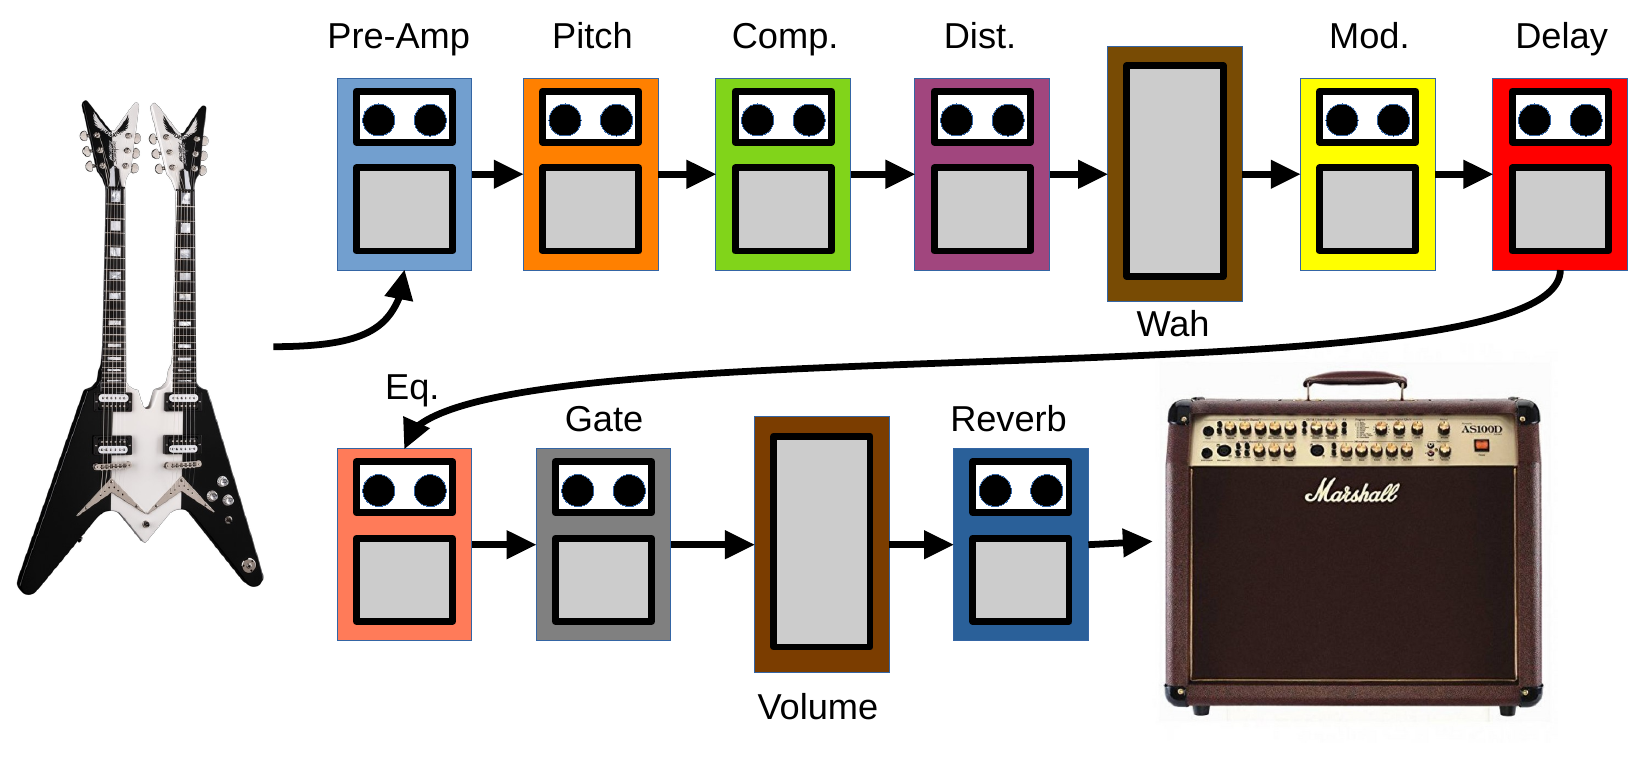
The figure above represents a more or less standard way to organize effect pedals.
- First there is a sequence of pre-amplification/pitch shifting/compressor which prepares the “clean” sound. A noise gate can also be added to remove the noise generated by the guitar pickup but here the noise gate is placed after the distortion/saturation because these effects produce a lot of noise too, if a tube amplifier is used.
- After that, there is a sequence of distortion/saturation/wah wah effects. Some people prefer to put the wah wah pedal earlier but this pedal is a filter and a filter has less effect on a clean sound than on a saturated one.
- Next, there is a modulation section composed of flanger/chorus/delay/echo/equalization. Some equalization can be added at the beginning of the chain, as well.
- Last there is the volume reverberation and cabinet emulation/amplifier.
Standard saturated sound
Now, let’s define a saturated sound without using AI.
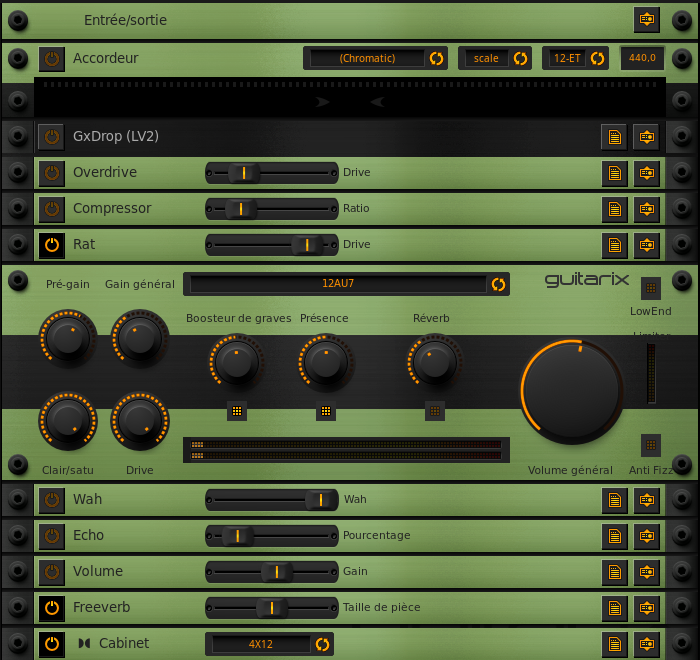
A quick description of this stack of plugins:
- at the top, there are two plugins: GxDrop (LV2) (check the mod-gxpitchshifter package in the Audinux COPR repository) and Overdrive. This is mostly to detune the guitar for metal (some songs are played with guitars tuned down five semi-tones). I added a small distortion because the down pitch shifting leaves a hole in the high frequencies and the small distortion helps filling this hole. This part is optional for the sound;
- a compressor. This can be optional too but for some techniques, it’s a plus (tapping, sweeping);
- a Rat distortion;
- the tube emulator with some drive to reach a good distortion sound. Adding a good distortion before this amplifier helps to shape the sound;
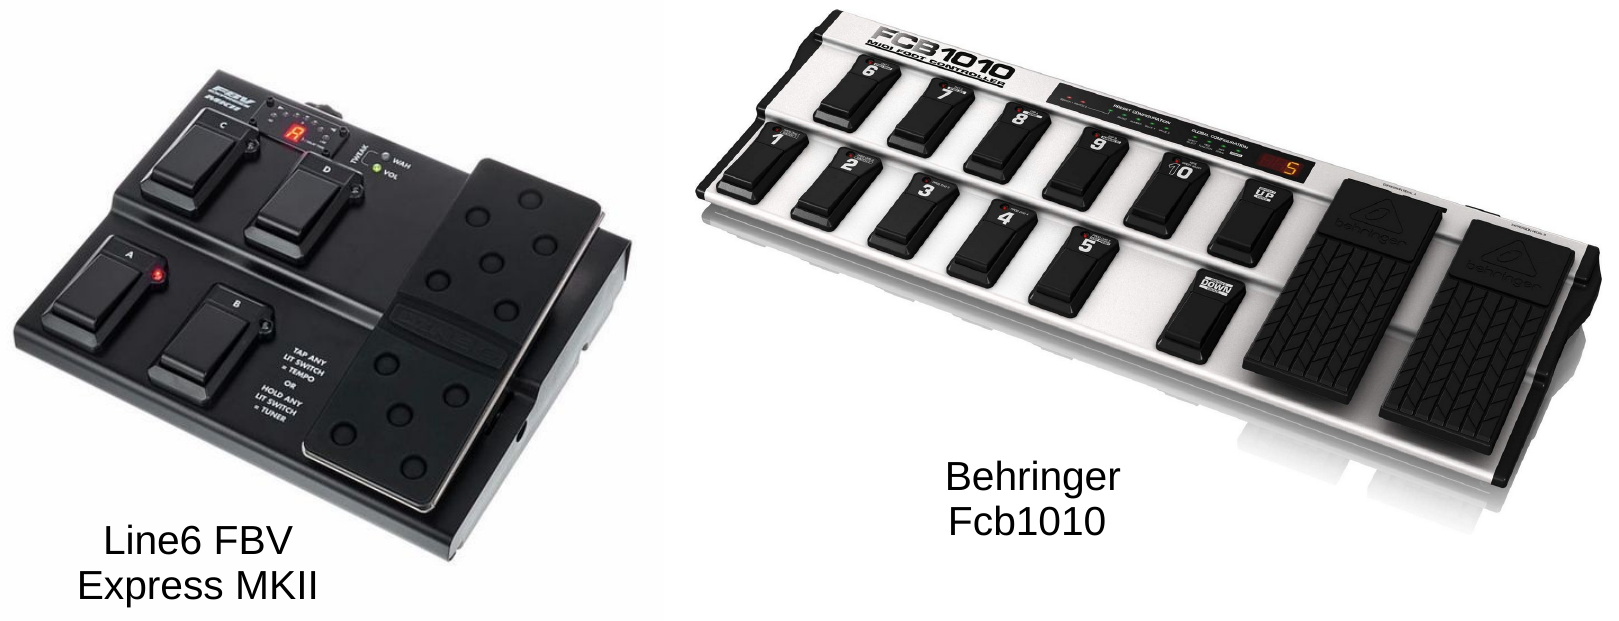
- the next three plugins are for the solo sound and are controlled by a MIDI pedal board (like the Behringer Fcb1010 or the Line5 FBV Express MKII);
- a reverb plugin to add some “space” to the sound;
- and finally, a cabinet emulation. This is an emulation of speaker. Here, we use the 4 x 12” speakers. This part gives a good identity to your sound, too.
With such a preset, we already have a good sound for a large set of music styles. Here is an example on Mercyful Fate / Lady In Black:
Neural network based saturated sound
We will now use a Guitarix plugin which loads a NAM (Neural Amplifier Modeler – [8]) model. This project was created around the begining of 2019. As you can see on the web page of the project [8], this project is now supported by many companies.
We will create a new sequence of plugins.
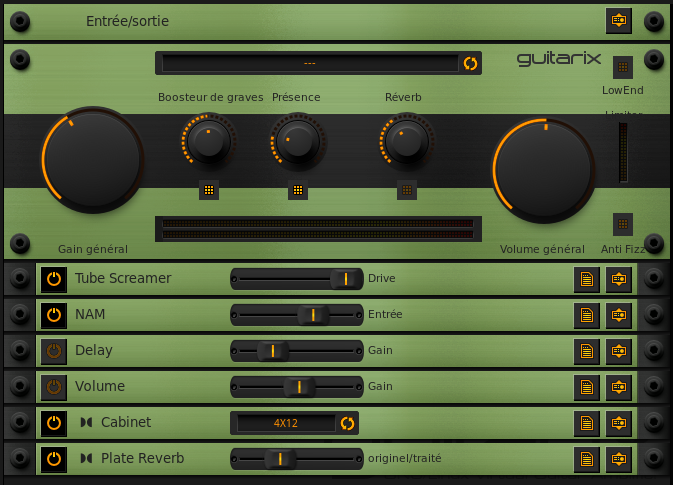
- The tube emulator has been put into pass through mode and is now a pure linear amplifier;
- we added a tube screamer (like the RAT distortion but with another style of distortion);
- and we have the NAM loader plugin. We used some pre-trained models available from ToneHunt [9];
- a deactivated set of delay / volume for the solo sound;
- a last set of cabinet / reverb plugin.
The sound used for the amplifier emulation is Marshall_JCM_800_2203. This may be downloaded from ToneHunt. The archive contains several NAM files. Each file corresponds to a model for a given setting of knobs (Pre-Amp, Bass, Medium, Treble, Master Volume, Gain). So for the selected NAM archive, we have 30 NAM files.
‘JCM800 2203 – P5 B5 M5 T5 MV5 G10 – AZG – 700.nam’
‘JCM800 2203 – P5 B5 M5 T5 MV5 G1 – AZG – 700.nam’
‘JCM800 2203 – P5 B5 M5 T5 MV5 G2 – AZG – 700.nam’
‘JCM800 2203 – P5 B5 M5 T5 MV5 G3 – AZG – 700.nam’
‘JCM800 2203 – P5 B5 M5 T5 MV5 G4 – AZG – 700.nam’
‘JCM800 2203 – P5 B5 M5 T5 MV5 G5 – AZG – 700.nam’
‘JCM800 2203 – P5 B5 M5 T5 MV5 G6 – AZG – 700.nam’
‘JCM800 2203 – P5 B5 M5 T5 MV5 G7 – AZG – 700.nam’
‘JCM800 2203 – P5 B5 M5 T5 MV5 G8 – AZG – 700.nam’
‘JCM800 2203 – P5 B5 M5 T5 MV5 G9 – AZG – 700.nam’
‘JCM800 2203 – P5 B5 M5 T5 MV6 G10 – AZG – 700.nam’
‘JCM800 2203 – P5 B5 M5 T5 MV6 G1 – AZG – 700.nam’
‘JCM800 2203 – P5 B5 M5 T5 MV6 G2 – AZG – 700.nam’
‘JCM800 2203 – P5 B5 M5 T5 MV6 G3 – AZG – 700.nam’
‘JCM800 2203 – P5 B5 M5 T5 MV6 G4 – AZG – 700.nam’
‘JCM800 2203 – P5 B5 M5 T5 MV6 G5 – AZG – 700.nam’
‘JCM800 2203 – P5 B5 M5 T5 MV6 G6 – AZG – 700.nam’
‘JCM800 2203 – P5 B5 M5 T5 MV6 G7 – AZG – 700.nam’
‘JCM800 2203 – P5 B5 M5 T5 MV6 G8 – AZG – 700.nam’
‘JCM800 2203 – P5 B5 M5 T5 MV6 G9 – AZG – 700.nam’
‘JCM800 2203 – P5 B5 M5 T5 MV7 G10 – AZG – 700.nam’
‘JCM800 2203 – P5 B5 M5 T5 MV7 G1 – AZG – 700.nam’
‘JCM800 2203 – P5 B5 M5 T5 MV7 G2 – AZG – 700.nam’
‘JCM800 2203 – P5 B5 M5 T5 MV7 G3 – AZG – 700.nam’
‘JCM800 2203 – P5 B5 M5 T5 MV7 G4 – AZG – 700.nam’
‘JCM800 2203 – P5 B5 M5 T5 MV7 G5 – AZG – 700.nam’
‘JCM800 2203 – P5 B5 M5 T5 MV7 G6 – AZG – 700.nam’
‘JCM800 2203 – P5 B5 M5 T5 MV7 G7 – AZG – 700.nam’
‘JCM800 2203 – P5 B5 M5 T5 MV7 G8 – AZG – 700.nam’
‘JCM800 2203 – P5 B5 M5 T5 MV7 G9 – AZG – 700.nam’
With the NAM plugin, some Jack settings may be required. A NAM file is around 300 ko and requires many computations. So, the Jack audio buffer must be adjusted to avoid Xruns (audio cracks during playback). We can use the following commands to adjust the sampling frequency and the buffer size:
$ pw-metadata -n settings 0 clock.force-quantum 256
$ pw-metadata -n settings 0 clock.force-rate 44100
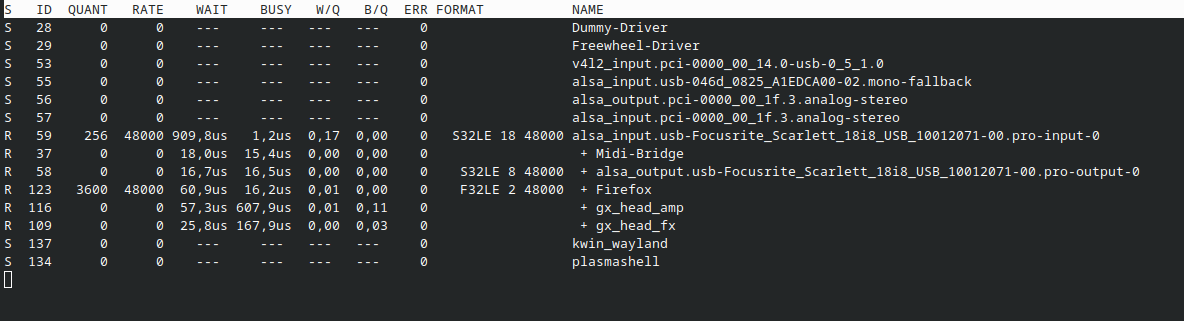
To check if you have some Xruns with this setting, use the command pw-top. This is a Pipewire command displaying a screen similar to top, but related to audio streams. The screen provides a lot of interesting information.
Let’s test this new preset on the same song as before:
Creating your own models
To create your own NAM model, you will need a data set which is composed of an input signal that will go through your gear and an output file which is the recording of the gear’s output.
The plugin neuralrecord [4] allows the automation of this process. This plugin is available in the Audinux COPR repository.
Once you have your data set ready, it’s time to use the Python package neural-amp-modeler [12].
$ pip install neural-amp-modeler
Once installed, follow the documentation to produce your model [13].
Mixing neural models
A drawback of using a neural model is that the model is only available for a configuration of the amplifier. If you want to have a sound which will go from clean to distortion, you will need to load all the intermediate models to have the corresponding sound.
A great tool which allows mixing some neural models exists: Ratatouille [21]. It’s a GUI which allows you to load two models and blend them using a knob.
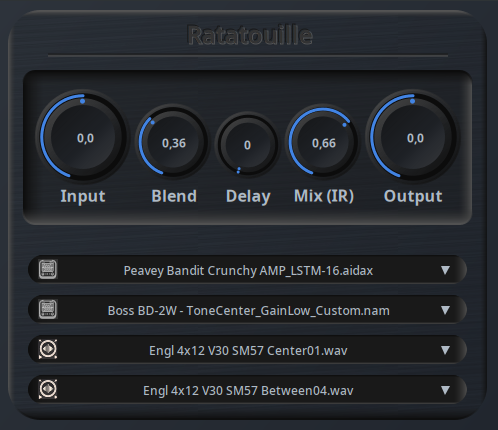
It supports various file formats and is available as a LV2 plugin.
Saturated sound using impulse response
Guitarix provides other tools that let you try to mimic some sounds. For example, you have the good old IR (Impulse Response) model which can produce some interesting sounds.
You can find these plugins in the “Reverb” section of Guitarix. There are two convolvers available:
- a mono convolver;
- a stereo convolver (the one with the icon next to it).
Drag and drop one of the two plugins in the plugin are and then click on setup. The following window pops up:
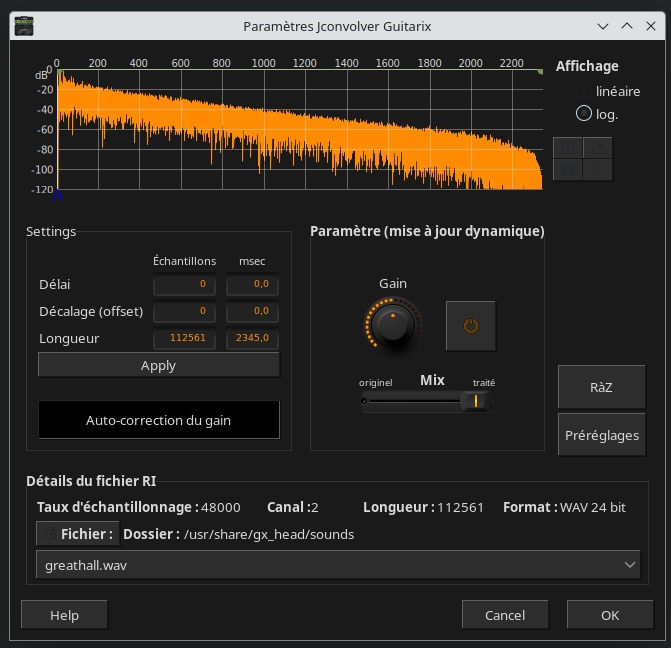
If you click on file, you will be able to select either a file to replicate the sound of an amplifier or a file to replicate the sound of a given guitarist.
For the amplifier, these impulse responses are available:
Blackat Leon S7
Cicognani Imperivm Luxury
DV Mark Triple 6
Engl Retro Tube
Engl Special Edition
EVH 5150 II
Fortin Natas
Kaos Sludge 15
Krank Krankenstein
Laney ironheart
MakosampCustomHatred
Marshall JMP 2203 Jose Arredondo mod
Marshall MG 15
Mesa Boogie Mark V
Peavey Vypyr 15
Randall Satan
Randall thrasher
Splawn Nitro
Splawn Quick Rod
Taurus Stomphead
And for the bands, the following impulse responses are available:
Arch Enemy Doomsday Machine
As I lay dying Awakened
Asking Alexandria Stand up and scream
Avenged sevenfold Nightmare
Belphegor Bondage goat zombie
Black dahlia murder Deflorate
Black label Society order of the Black
Bullet for my Valentine Temper Temper
Cannibal Corpse Vile
Carnifex Until I feel nothing
Children of Bodom Are You Dead Yet
Chimaira Ressurrection
DAATH The Hinderers
Dark Tranquility Character
Decapitated Carnival Is Forever
Deicide The Stench Of Redemption
Devildriver The last kind words
Dimmu Borgir Enthrone Darkness Triumphant
Disturbed Indestructible
Divine Heresy bringer of Plagues
Down NOLA
Dream Theater Black Clouds & Silver Linings
Dying Fetus War of Attrition
Evile FIVE SERPENTS TEETH
Exodus Exhibit B The Human Condition
Exploited beat the Bastards
Fear Factory Demanufacture
Firewind Days of Defiance
Godsmack The Oracle
Gojira LEnfant Sauvage
green day Dookie
Hamlet Amnesia
hatebreed The divinity of purpose
Helloween better than Raw
Hexen Being and Nothingness
Hora Zulu Siempre
Impending Doom The Serpent Servant
In Flames Whoracle
Killswitch Engage As Daylight Dies
Kreator Violent Revolution
Lamb of God Wrath
Legion of the Damned Descent Into Chaos
Machine head Through the ashes of empires
Manowar Battle Hymns MMXI
Mastodon Curl of the Burl
Megadeth Youthtanasia
Napalm Death Time Waits For No Slave
NEWSTED
Overkill The Years of Decay
Pan de Higo
Pantera Vulgar display of power
Papa roach Getting away with murder
Paradise lost Tragic Idol
Red Fang Murder the Mountains
Sepultura Arise
Slayer Christ illusion
Slypknot Iowa
Soulfly Enslaved
Stone Sour House of Gold and Bones
Stratovarius legions
Symphony X Iconoclast
System of a Down Toxicity
Testament dark Roots of Earth
Textures Silhouettes
The Sorrow Misery Escape
Trivium In Waves
Vader Necropolis
Warcry Revolucion
Wayne Static Pighammer
White Chappel Hate Creation
The use of an impulse response is far less computer intensive than the computation of a NAM model. So, if you can do it with an impulse response, do it with an impulse response!
If you want to compute your own impulse response, check SpecMatch [14]. This tool (by the developer of Guitarix) helps you to compute this.
Here is the result on the song Mercyful Fate / Lady In Black:
Fine tuning the sound using visualizers
A first way to fine tune your sound: your ear …
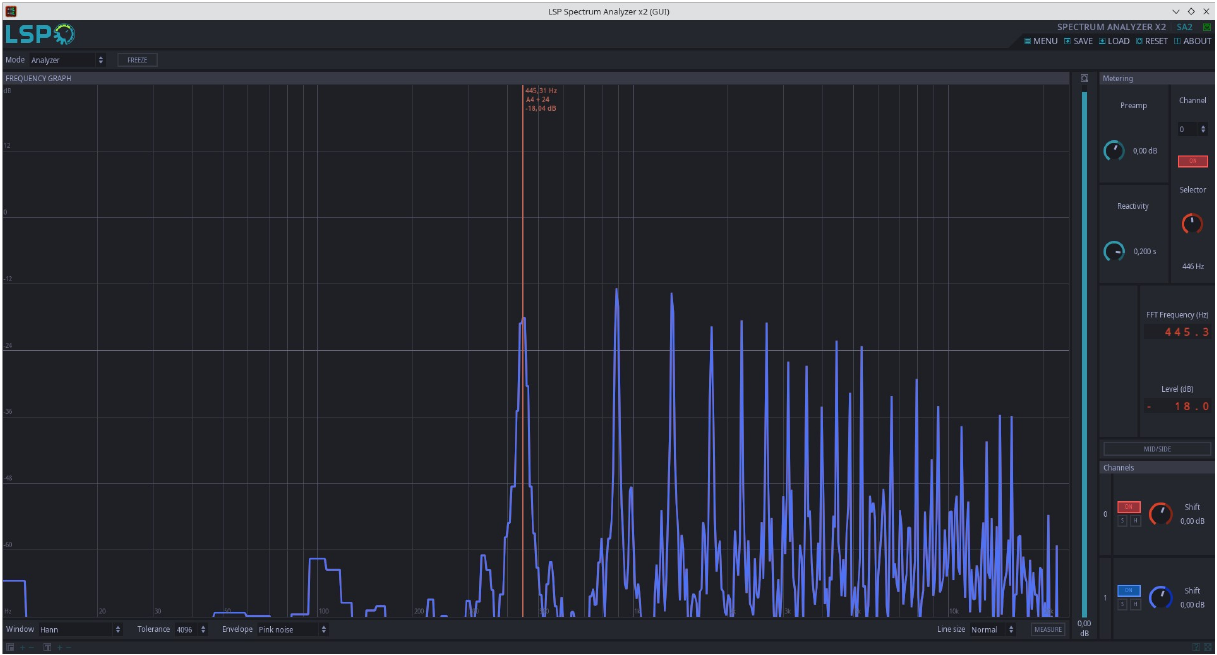
But you can also rely on visualizing the spectrum of your signal. The are several plugins available to display a spectrum in Audinux. A nice one is LSP Spectrum Analyzer [17].
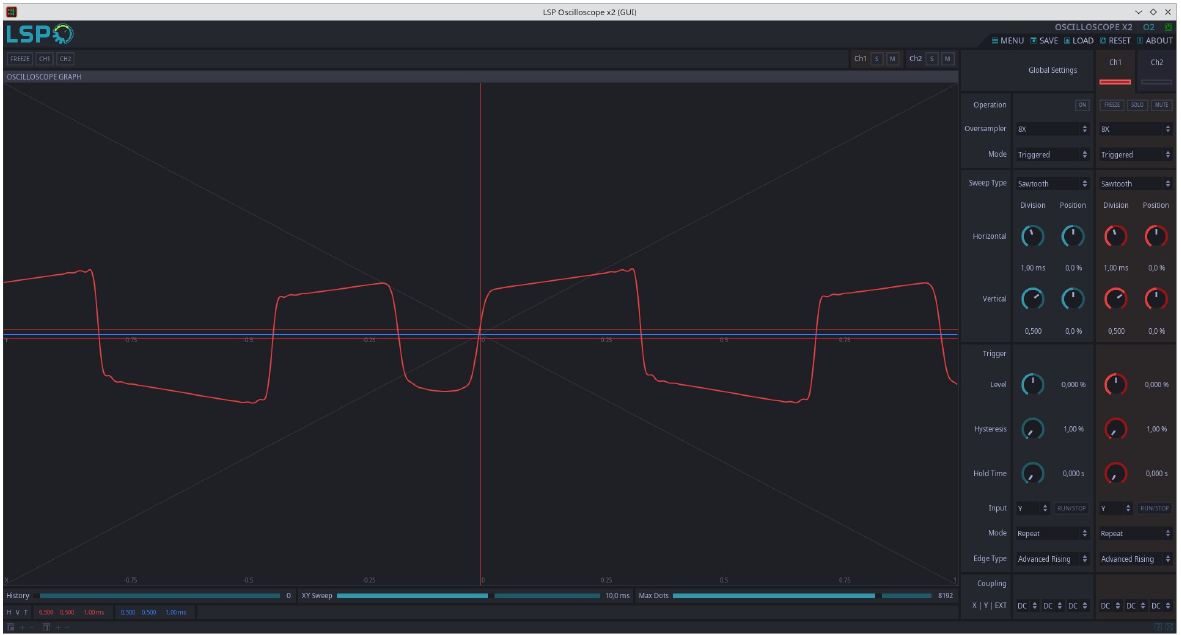
You can also visualize the temporal representation of your signal via an oscilloscope. Guitarix has a plugin to do that but LSP Oscilloscope is a little bit more powerful for that [17].
To be able to use such a tool, you first have to start carla which is a plugin rack compatible with LADSPA / LV2 / VST / VST3 plugins. Once carla is started, you have to load the ‘LSP Spectrum Analyzer x1‘ (with one signal displayed) into carla. And last, you have to connect the Guitarix output (blue ports in the Guitarix block) to the carla input (blue ports in the Carla block).
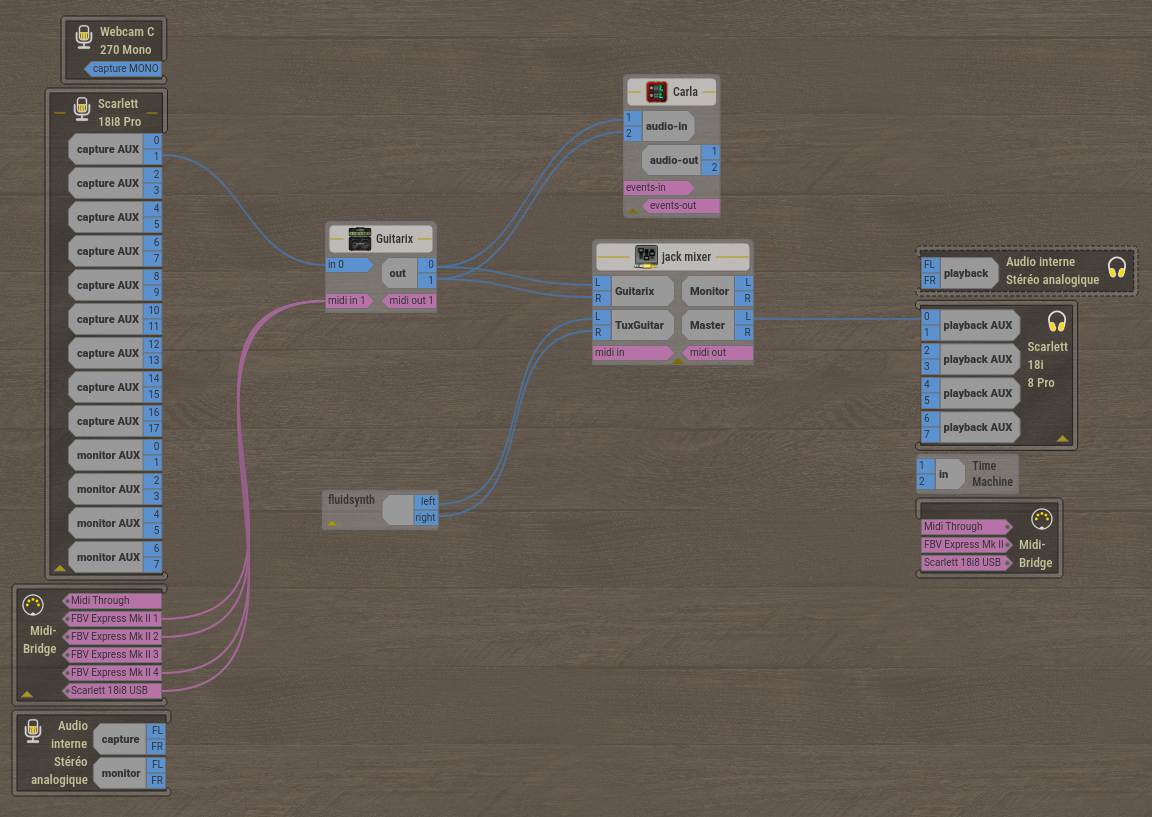
This representation is copied from the Ray Session display. Ray Session is a nice tool. It allows starting a session which is composed of applications (started automatically by Ray Session) and Jack Audio connection (reconnected automatically by Ray Session once a session has been saved). Ray Session saves a lot of time because it sets everything for you.
In this graphic, some other tools are interesting:
- the fluidsynth block corresponds to the TuxGuitar application;
- the timemachine block is a really simple Jack Audio recorder (records the audio input to a wav file in the user directory);
- the jack_mixer block is an audio mixer used here to balance the audio level between Guitarix and TuxGuitar
- the ‘Audio interne stéréo analogique‘ is the audio inputs from the computer (one block for the inputs the other for the outputs);
- the ‘Midi Bridge‘ are the MIDI connections coming from ALSA and from Jack Audio (one block for the inputs the other for the outputs);
- the ‘Scarlett 18i8 Pro‘ block are the audio inputs from the USB audio interface (a Scarlett 18i8 USB interface) (one block for the inputs and one block for the outputs);
- the ‘Webcam 270 Mono‘ block is the mono audio input from the webcam.
This is one of the big advantages of the Pipewire-Jack solution with respect to the standard Jack Audio (which was only able to see the inputs / outputs of the selected audio interface).
Conclusion
As you can see, the tools we have at our disposal to generate guitar sounds are quite effective. We focused on the saturated sound of a guitar, but the different tools we covered allow you to model/imitate amplifiers, guitarist sounds, cabinets and reverberations. All of these tools offer great flexibility in constructing the sound we are looking for. These tools will be used more and more in the future. But let’s keep in mind that certain solutions (such as impulse responses) offer good performance/sound quality tradeoff and that the appearance of neural networks should not make us forget this technique.
Webography
[1] https://github.com/AidaDSP/AIDA-X
[2] https://github.com/mikeoliphant/neural-amp-modeler-lv2
[3] https://github.com/brummer10/neural-amp-modeler-ui
[4] https://github.com/brummer10/neuralrecord
[5] https://github.com/brummer10/Ratatouille.lv2
[6] https://github.com/brummer10/guitarix
[7] https://github.com/Houston4444/RaySession
[8] https://www.neuralampmodeler.com
[10] https://audinux.github.io
[11] https://copr.fedorainfracloud.org/coprs/ycollet/audinux
[12] https://github.com/sdatkinson/neural-amp-modeler
[13] https://neural-amp-modeler.readthedocs.io/en/latest
[14] https://github.com/brummer10/SpecMatch
[15] https://github.com/brummer10/guitarix.vst
[16] https://github.com/falkTX/Carla
[17] https://github.com/lsp-plugins/lsp-plugins
[18] https://mod.audio
[19] https://aida-x.cc
[20] https://cloud.aida-x.cc/all