How to Download and Install Debian 12 on VMWare Workstation – LinuxWays
VMWare or Virtual Machine Ware is a free-to-use Software with the help of which we can run multiple Operating Systems like Debian 12 on our system. If you have a Windows/Linux Operating System, you can easily run virtual machines using the VMWare Desktop Application.
Debian 12 is a Linux distribution which is a Unix-type kernel. It consists of over 59,000 packages that the developers can use for multiple uses like connecting to the internet, playing games, making music/sounds, software development, documentation, and many more. Unlike other Linux distributions, Debian Linux offers more stability and it is easy for the user to upgrade from the older version to a new version with the smooth upgrade process that Debian Linux offers.
How to Download and Install Debian 12 on VMWare Workstation
Before diving into the installation process of Debian 12, we first have to download and install the VMWare Workstation on our system to use Debian 12.
Downloading and Installing VMWare Workstation
To download and install the VMWare workstation, follow the steps below:
Step 1: Search for VMWare Workstation on Browser
Open up your browser and search for VMWare using any search engine or follow the official link to open up the download page VMWare.
Once the VMWare website is opened, scroll down and click on “DOWNLOAD NOW”. If you are using Windows, download the Application for Windows, and if you are using Linux, download it for Linux. For now, we will download the application for Windows.
Wait for it to download and once downloaded, start the downloaded application.
Step 2: Start the Downloaded Application
Once you run the downloaded file, a Pop-Up Setup wizard will appear. Click on Next. Make sure to “Accept the Terms” of End-User License by clicking the checkbox.

Clicking on Next will open up the Compatibility Setup Menu.

If your System supports Hypervision, click on the checkbox to Install Windows Hypervision Platform (WHP). This will help you in creating and using/running multiple Operating Systems on your host machine. We will click on the checkbox to Install WHP.

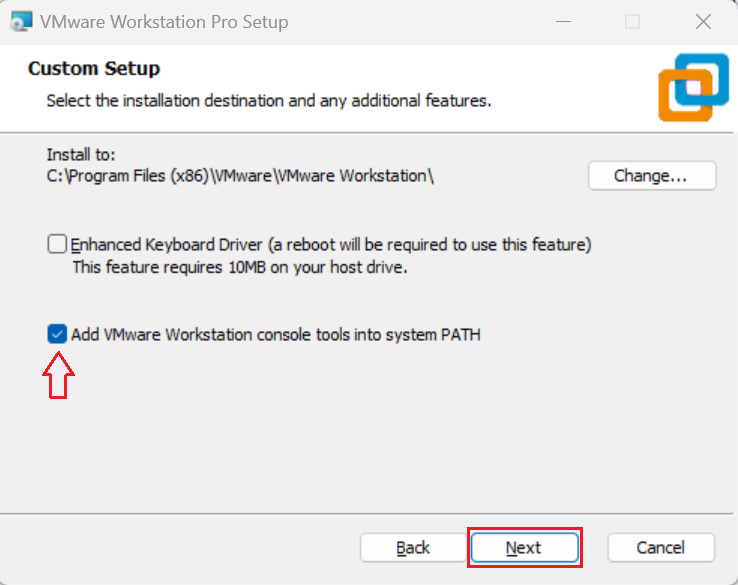
Click on Next, a Custom Setup page will appear, Leave it as it is, i.e., the “Add VMWare Workstation console tools” checkbox will be true. You can also change the installation folder to anywhere you want. By default, it will be installed in the Program Files (x86) directory.
Once clicked on Next, a User Experience Settings will appear, leave it as it is.

Once you click on Next, a shortcut page will appear which will help you in creating a shortcut for the application. Click on “Next” and then start the Installation Process.

As the installation completes, start your VMWare Application either by going to the directory where it is installed or searching for it using the Windows search menu.
Step 3: Launching VMWare
In order to run the VMWare application, either search for it using the Windows search menu or go to the following directory:

The path can vary depending on the directory you installed your VMWare Application in. Here, scroll down or search for the “vmware.exe” file. It will have a VMWare icon with it.

Start the application by clicking it. The application will start by asking you to enter the License Key. Add the License Key if you have any and then Continue. If you don’t have the License Key and you want to buy it later, click on the Free Trial version for 30 Days and click Continue. For now, we will use the Free Trial Version.

Once you have clicked “Continue”, it will start the VMWare application where you can Create a virtual machine, open a virtual machine, or connect to a remote server.

Downloading Debian 12
To download Debian 12, search for Debian 12 online. We can either download the Image file for Debian 12 or an ISO file for Debian 12. Both of them serve the same purpose but we will be downloading the ISO as it is more reliable, widely supported, and easier to use. You can Download Debian ISO from the official web page.
Step 1: Download Debian
Once you are on the download Debian page, you can either download the CD version or the DVD version. To download the complete Debian 12 with packages, scroll down and click on “amd64”.

Once you have clicked on the amd64, it will redirect you to an additional information page about that version. Download the .iso file:
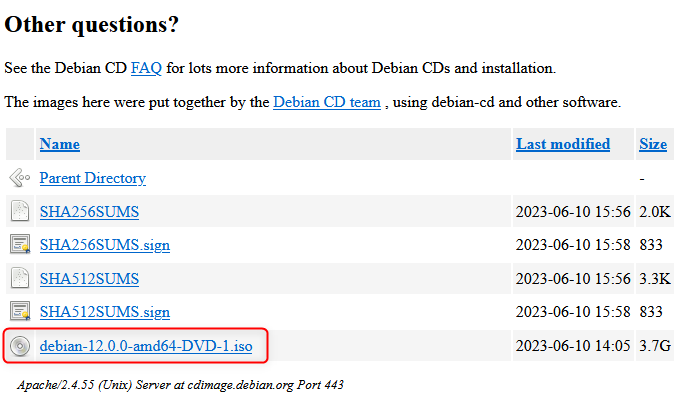
Once you have clicked on the ISO file, it will start Downloading.

Step 2: Debian Setup with VMWare
Once the Debian File is downloaded, start your VMWare. Click on “Create a New Virtual Machine”. A new window will pop up asking for the type of configuration you want.

By default, the recommended (typical) settings would be selected unless you want to make a custom configuration. We will proceed with the recommended settings and click Next.
In the new window add the path of the ISO file. Click on “Browse…”.

Now add the path of the Debian File that you downloaded earlier.
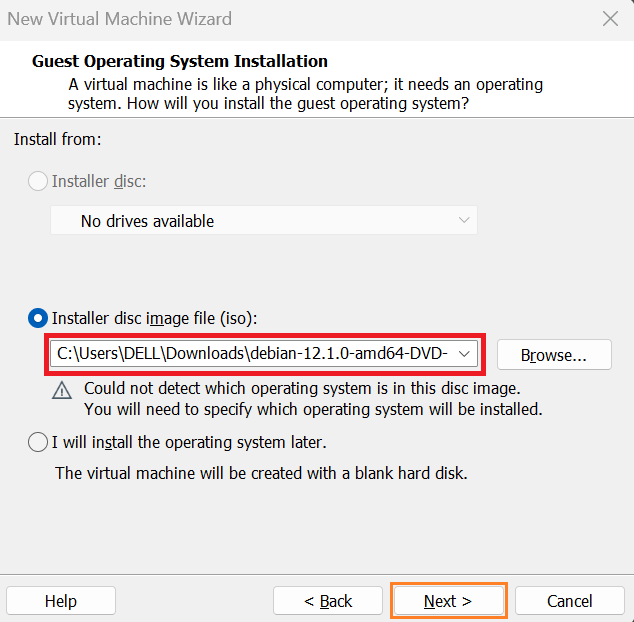
Click on “Next”, once you have added the path of the ISO file. Select “Linux” from the Guest Operating System and then select the latest version of Debian.


Click on Next and now it will ask you the Virtual Machine Name and the Location. Add the location and Name if you want to change it from default.

Click on Next. A new window will appear now asking for the Disk Capacity. Enter the Maximum Size that the Virtual Machine should occupy on your disk and select whether you want the disk to be split into multiple files or not.

By default, it will occupy a space of 20GB and the Disk will split into multiple files, so we will go with the default settings. Click on Next now. Now another window will show you the finalized configuration.

Once you click on Finish, it will create a New Virtual Machine.

The new Virtual Machine is created on the left side. Start up your Virtual Machine.

Once the Virtual Machine Starts, an Installation Window will appear, click on “Graphical Installation”. You can also choose the Normal “Install” Option but with the graphical Installation, your frontend would be more appealing.

Now it will redirect you to the Language page where you will select the Language you want to use for this Virtual Machine. Select the Language and click on “Continue”.

Once you have selected the Language, select your location and click on ‘Continue’.
Now you have to select the configuration for your keyboard. In this case choose the default one, i.e. ‘American English’.

Clicking next redirects you to configure your network. In this, enter the Host Name and then click on ‘Continue’.

After entering the hostname, you have to enter the domain name. Enter the Domain Name: 
Now you have to enter the configuration of the new users. Add a new user and click Continue. After you have added the new user, now add the password for the new user. Continue after adding password:

After entering the password, now you have to add the username for the account. Add the username for the account and click on ‘Continue’.

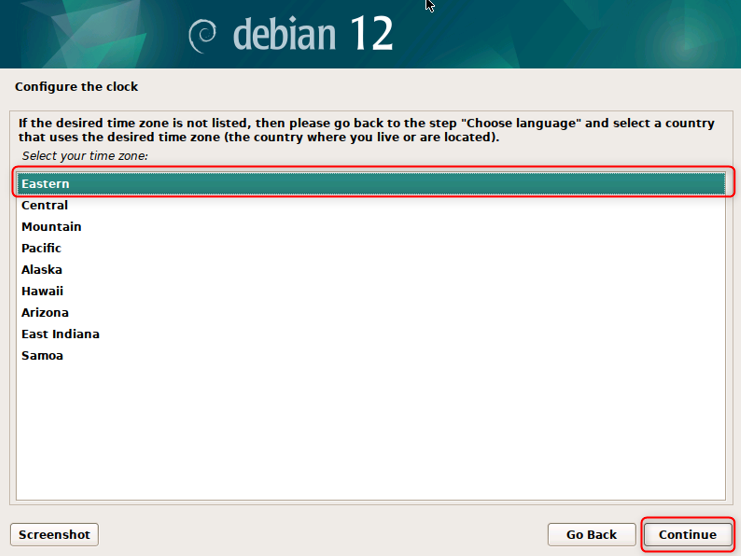
Now you have to configure the Time Zone for your Virtual Machine. Select the time zone:
Now a new Window Pops up and you have to partition the disk in this. By default, the partitions are guided so we will select that. Once selected, click on ‘Continue’.

Now you have to select the disk to make partitions to. By default it will only be one disk, so click on it and click ‘Continue’.

Now you have to select the Partitioning Scheme. Select the option with ‘All files in one partition’ as it will make all of your files to be partitioned together.
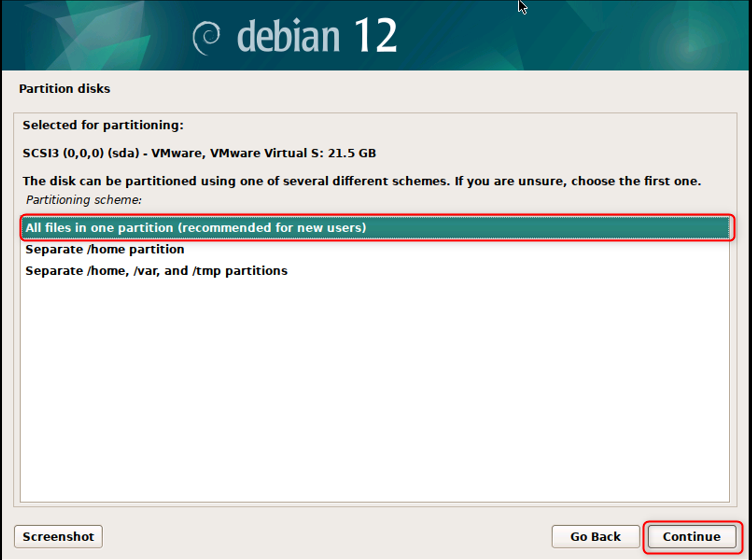
Now once you click on Continue, the new window will show you the finalized configuration, click on Finish Partitioning and then click on ‘Continue’.

Now it will ask if you want to write the changes to your disk, click the option ‘Yes’ and then click on ‘Continue’.

The Installation of the base system will start, wait for it to complete. Once the installation is completed, a new window will pop up asking about the configuration of the package manager. If you want to scan for another installation media, click on Yes otherwise click on No. We will select ‘No’. Click on ‘Continue’ then.

Now it will ask if you want to use a network mirror mainly for the software updating process and the update of packages. Select ‘Yes’ and then click on ‘Continue’.

Now choose the Country in which you want to mirror your network so that the updates or Debian archives can be accessed. After selecting your country, click on ‘Continue’.

After you select your region, it will ask you about the Debian Archive Mirror. ‘deb.debian.org’ is by default so select it and click on ‘Continue’. After you click on continue it will ask about the Proxy so leave it blank and click on ‘Continue’.

Now the package manager will start installing the packages, and wait for it to complete. During the installation process, it will ask for permission to take surveys on the package usage. Click ‘Yes’ if you want to provide feedback on every new package added and its usage. Click ‘No’ if you do not wish to participate and then click on ‘Continue’.

Now a window will appear after installation saying that only the core is installed, you can now tune your virtual machine configuration according to your needs. You should also select ‘KDE Plasma’ apart from the already selected options. With KDE Plasma you can efficiently launch applications and it also helps you in navigation across your virtual machine. Once selected, click on ‘Continue’.

Wait for the installation to finish. Now it will ask to select the desktop manager. You can choose either ‘ssdm’ or ‘gdm3’. Both are better in their own way, SDDM provides you with a better user interface whereas ‘gdm3’ provides you an easy way to customize your desktop application. We will choose ‘gdm3’. Click on ‘Continue’ after you select your option.

Wait for the workstation to install the necessary packages and configuration. Once installed, it will ask for you to install the GRUB Bootloader to the primary drive. The GRUB Bootloader makes the Operating system run at the system boot time:

Now it will ask you to select the device for bootloader installation. Select ‘/dev/sda’. It is the drive/hard disk of our system.

The installation is completed now. Click on ‘Continue’ now to reboot the Operating System.

Once the system reboots, your Debian will start.

Enter your account password to login to the system.

Once you press enter your Debian Home Screen will appear. Thus your Debian/Linux is ready to be used.

Deleting Debian 12 from VMWare Workstation
To delete VMWare from your VMWare workstation follow the steps below.
Step 1: Open VMWare Workstation
Once you have opened the VMWare Workstation, you can see the list of installed virtual machines on the left side of the VMWare Workstation Interface in the Library.

Step 2: Open the Virtual Machine Properties
Right-click on the OS you wish to delete, in our case, it is Debian 12. Once you right-click it will open the properties menu. Click on ‘Manage’

Step 3: Delete Debian 12
Once you move your cursor to the Manage options, it will expand and you will see the ‘Delete From Disk’ Option. Click on it to delete/remove the Virtual Machine, in our case Debian 12, from your Drive.

Conclusion
To download Debian 12 to your system, you need to download and install VMWare Workstation first which gives you the opportunity to use multiple virtual machines or operating systems on your system. This article highlights the process of Downloading and installing VMWare. For that, you have to go to their official website and download the workstation according to your system. Install and make necessary changes. After Installing VMWare, you now need Linux/Debian to run on it. For that, you have to download Debian ISO’s latest version from their website and then add it to your VMWare workstation. Once added follow the steps given above to install Debian 12.
