A Complete Guide – LinuxWays
Kali Linux is an open-source, powerful Linux operating system that is used by the security professionals for penetration testing and ethical hacking. It includes robust security tools that help you begin your hacking career with ease. Raspberry Pi on the other hand is a low-powered, credit card size device and can be a good companion for Kali Linux. The reason is you can carry this device anywhere and carry out your hacking tasks. Besides that, Kali Linux is a lightweight operating system that doesn’t overpower your device’s processing capability, allowing you to seamlessly run testing tools on the system.
In this guide, you will learn:
How to Install Kali Linux on Raspberry Pi
You can install Kali Linux on Raspberry Pi using:
How to Install Kali Linux on Raspberry Pi Using BalenaEtcher
BalenaEtcher is a useful application for creating an image of the operating system on the SD Card or USB Device. To install Kali Linux on Raspberry Pi using BalenaEtcher, you can follow the below-given steps:
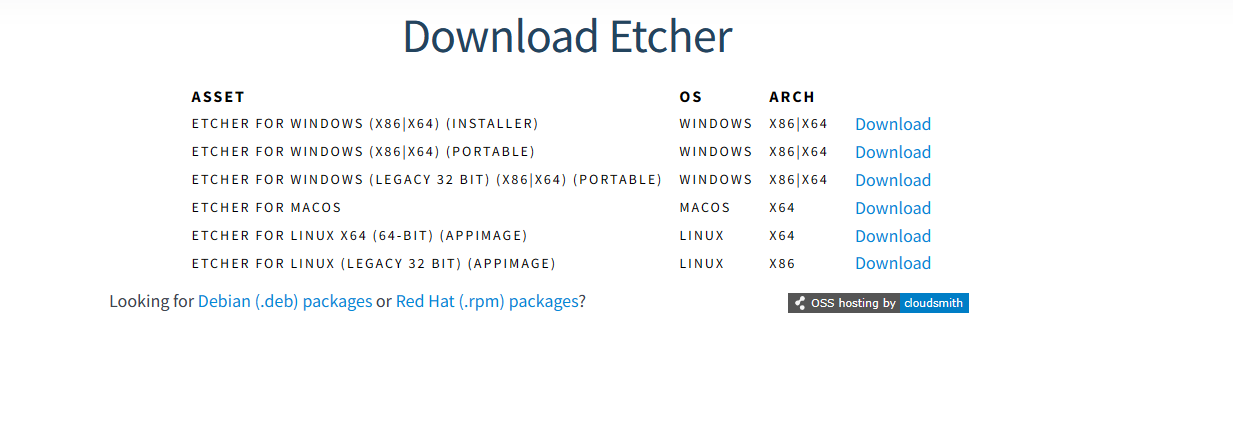
Step 1: Download and Install BalenaEtcher on Windows, Mac or Linux
First, download and install BalenaEtcher imager tool that allows you to load the image file and create its image onto the USB.
You can download the BalenaEtcher exe file on your Windows system from the official website and install it on your system.
You will also find packages for your Mac or Linux system, in case you are using macOS or Linux operating systems:
Step 2: Insert and Format SD Card
You must require an SD Card of at least 32 GB for Kali Linux because of the size of setup files, which is around 15 GB; you can insert your SD Card into your system using a Card Reader and format it properly.
Step 3: Load the Kali Linux Image File
Open BalenaEtcher application on your system and click on the Flash from file option:

Then select the Kali Linux image file:

Step 4: Select the Target Location for Kali Linux
Now, choose the Select target option:

Then choose the SD Card storage as your primary target where you are going to load the Kali Linux image file:

Step 5: Flash Kali Linux Image
Now, choose the Flash! option to allow BalenaEtcher to create the Kali Linux image on the SD Card:

The process will begin creating the Kali Linux image on the SD Card, it may take some time depending on your card write speed:

Step 6: Boot Kali Linux on Raspberry Pi
After the flash process is finished, you can remove the SD Card and insert it into your Raspberry Pi’s SD Card pocket. Turn on your Raspberry device and wait for a few seconds until you see the Kali Linux login screen.
Step 7: Login to Kali Linux on Raspberry Pi
By default, you can log in to Kali Linux on Raspberry Pi using the default username and password as kali:


How to Install Kali Linux on Raspberry Pi Using Raspberry Pi Imager
Besides using the BalenaEtcher application, you can also use the Raspberry Pi Imager to install Kali Linux on Raspberry Pi; you can do this by using the following steps:
Step 1: First, go to the Raspberry Pi official website and download Raspberry Pi Imager from there. Ensure downloading the latest version of Raspberry Pi Imager because it includes separate hardware options for Raspberry Pi model including the latest Raspberry Pi 5:

Note: You must install Raspberry Pi Imager on your system from the setup file that you downloaded earlier.
Step 2: Now, Insert Raspberry Pi SD Card into your other system where Raspberry Pi Imager is installed. Then open Raspberry Pi Imager and select your Raspberry Pi device by selecting the CHOOSE DEVICE option:

Step 3: Choose your device from the list, either Raspberry Pi 4 or Raspberry Pi 5, here I am selecting Raspberry Pi 4:

Step 4: Now, click on the CHOOSE OS option:

Step 5: Scroll down and choose the Use custom option:

Step 6: Then select the Kali Linux operating system by double-clicking on the image file:

Step 7: Now, click on the CHOOSE STORAGE option:

Step 8: Select your SD Card storage as a primary storage for Kali Linux:

Step 9: Then click the Next button after selecting the storage:

Step 10: Go with Yes option in case you want to go with the default OS options, or you can manually customize the OS Settings, like adding username, Wi-Fi credentials, hostname and more:
Here, I am going with the default Kali Linux settings:

Step 11: Choose the Yes option to allow Raspberry Pi Imager to format your SD Card and start the flashing process:

Wait until Raspberry Pi Imager completes the flashing process, which might take some time depending on your SD Card write speed:

Once the process is completed, follow Step 6 and Step 7 of the first method to successfully boot Kali Linux on Raspberry Pi.
Conclusion
Kali Linux is an OS widely used for ethical hacking and penetration testing and can be installed on Raspberry Pi from BalenaEtcher or Raspberry Pi Imager tools. Both these tools can be downloaded and installed easily on any system. After that, simply download Kali Linux image file, insert an SD Card using a Card Reader into the system and open any imager application to create the image of the OS on the SD Card. Once completed, simply remove the SD Card and insert it back into the Raspberry Pi, reboot the device and insert the required credentials to successfully boot Kali Linux on Raspberry Pi.
By day, I am an engineer and researcher, building bridges and figuring out how the universe works. But when the clock strikes five, I turn into a wordsmith!
I write about my adventures on my blog, sharing tips and tricks to help others join the tech fun. I have worked on Raspberry Pi, Ubuntu, Debian, and Laptops. Right now, I have accepted the challenge of working on the Kali Linux system, and with my vast expertise in Linux systems, I will help users overcome the challenges through my blogs.