How To Setup C++/OpenGL Programming Tools on Ubuntu and Start Learning
This tutorial will help you install all requirements for C++/OpenGL programming and immediately start learning by reading opengl-tutorial.org. You will be able to build all the source codes both ways manually using commands as well as using Qt Creator. We dedicate this to all Computer Science & Informatics students everywhere especially those who are currently learning OpenGL lectures. Now let’s exercise!
Subscribe to UbuntuBuzz Telegram Channel to get article updates.
The tutorial advises us to use Qt Creator so we do it:
$ sudo apt-get install qtcreator
Once installed, Qt Creator (green) will be available on applications menu.
To install C++ compiler we use this command:
$ sudo apt-get install g++
Once installed, it will be usable from command lines in the Terminal.
To install the required libraries and tools, according to the tutorial we use this command:
$ sudo apt-get install cmake make g++ libx11-dev libxi-dev libgl1-mesa-dev libglu1-mesa-dev
Picture:
However, on Ubuntu 23.10 “Mantic Minotaur”, we encountered errors and we found that we need to add more packages as the following:
$ sudo apt-get install xorg-dev libglu1-mesa-dev
Picture:
Once all requirements installed, you are ready to proceed to the next step.
You need the source code examples. The tutorial provides that in form of package. Thus, You need to extract the package into the right folder and know where to put another folder for the Qt Creator project.
(1) Create a new folder “Projects” in your Home.
(2) Visit Part 1 of OpenGL Tutorial (see References section below) -> see Building on GNU/Linux section -> click Download the source code from step number 3 -> click Tutorials source code on GitHub, .zip -> you downloaded a package file named “ogl-master.zip” by 12 MB. See picture below.
(3) Put ogl-master.zip into Projects.
(4) Extract it.
(5) You got a folder “ogl-master” containing all the source code files organized in a lot of folders, one of them are tutorial01_first_window, and one CMakelists.txt.
(6) Remember this folder for Qt Creator will put its project folder “build-ogl-master-x-y” also in this folder. The path is ~/Projects following the tutorial.
You need to test whether you can compile, build and execute the whole of the source code samples. This is reached using CMake automatic build tool.
(1) Right-click -> Open in Terminal inside the folder “ogl-master“.
(2) Create a new folder named “build“.
(3) Run this command line and please wait for compilation will take place:
$ cmake ..
(4) Compilation process finished.
(4) Visit the folder “build“.
(5) The “build” folder now contains a lot of files required for the next compilation process. Among those files are “Makefile” and a bunch of “*.sh” files.
(6) Run this command and wait for the process it will take much longer to finish:
$ make all
(7) Compilation finished by 100%.
(8) Leave the “build” folder.
(9) Visit back “ogl-master” folder.
(10) Visit “tutorial01…” folder.
(12) Now, this folder contains an executable file named the same as the folder produced by compilation process above. On Ubuntu, it looks like a grey icon with gear.
(13) Execute the executable file and use TAB key to automate typing the name:
$ ./tutorial01...
(14) Program runs. A window with black or blue color should appear on screen.
Program 01 First Window
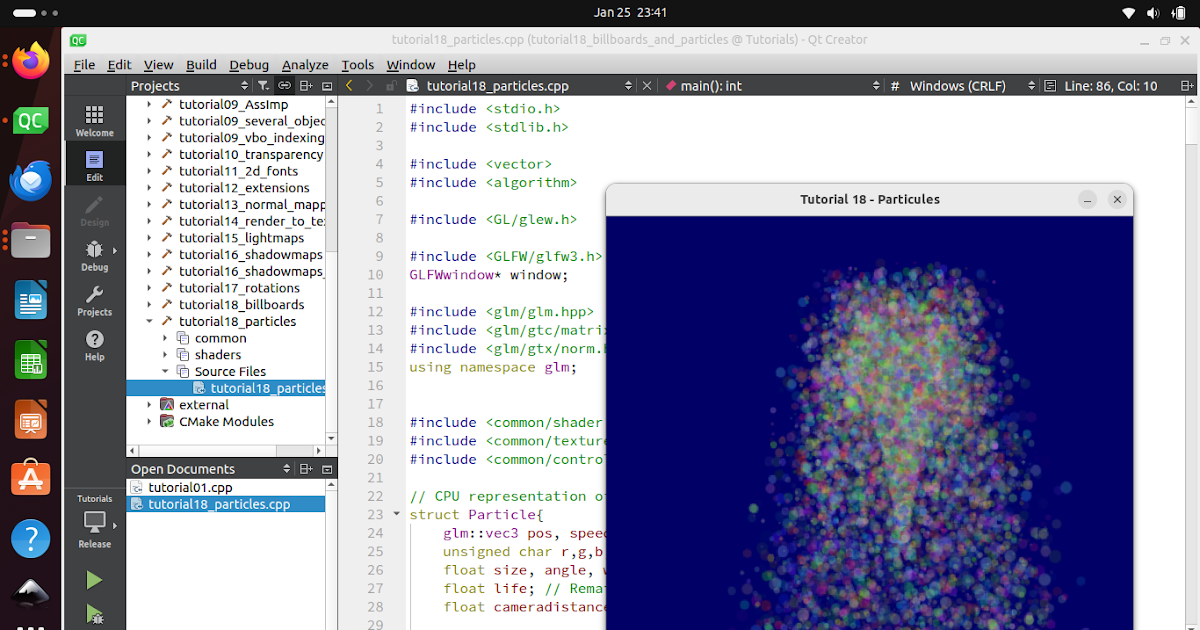
(15) Repeat step number 9-14 for other folders from tutorial02 to tutorial18 and from misc01 to misc05. For example, below are sample codes triangle, matrices, and cube:
Program 02 Red Triangle
Program 03 Matrices
Program 04 Colored Cube
(16) To this point, you are able to compile, build and execute the programs manually. Continue next step to do it automatically with Qt Creator.
You need to configure Qt Creator to use CMake and point to the source code directory to be able to compile, build and run by clicks. Essentially, when you choose a tutorial and press Run, Qt Creator will automatically compile and build and run the program for you.
(1) Run Qt Creator.
(2) File -> Open File or Project -> navigate to “ogl-master” -> select CMakeLists.txt -> Open.
(3) A new project “Tutorials” will open consisting of all source code files from ogl-master in form of folders with hammer logo. Notice CMakeLists.txt file is listed at top.
(4) Click Hammer (Build) to bottom-left. This is equal to ‘make all’ step above. Please wait for the process takes several minutes. Once finished, it will show 100% message like before under Compile Output at bottom.
(5) In the project listing, open tutorial01 -> Source -> tutorial01.cpp -> source code will open.
(6) Projects -> Build & Run -> Run -> Working directory: -> change it to corresponding tutorial directory and in this case tutorial01_first_window -> go back to Edit. Essentially, every tutorial should point to its own directory under Working directory option.
(7) Right-click tutorial01 -> Run -> it compiles -> it runs.
(8) To compile, build and execute other programs, repeat step number 5 to 7.
Finally, you can start learning by trying out the source code samples one by one using Qt Creator. Edit the code, Run, see what changes, and repeat. All in all, read the tutorial as your reference. Happy hacking!
Compilation of Various Programming Languages Setup on Ubuntu
http://www.opengl-tutorial.org/beginners-tutorials/tutorial-1-opening-a-window/
https://github.com/openMVG/openMVG/issues/85
https://medium.com/geekculture/a-beginners-guide-to-setup-opengl-in-linux-debian-2bfe02ccd1e
https://programminggems.wordpress.com/2019/11/27/getting-started-with-opengl-from-c-c/
http://www.codebind.com/linux-tutorials/install-opengl-ubuntu-linux/
Thank you to the authors of OpenGL Tutorial!


