A Complete Guide – LinuxWays
Kali Linux is a powerful Linux-based operating system designed especially for penetration testing and ethical hacking. It offers several preloaded security tools that make it a go-to platform for security professionals and enthusiasts alike, and to test these tools, you must install Kali Linux on your system. The widely used approach to install Kali Linux on a system is to use a Virtual Machine that allows you to use the operating system without harming your own computer. This is where VirtualBox comes in.
VirtualBox is a kind of Virtual Machine that creates a separate environment where you can install and run Kali Linux without affecting your main operating system.
In this guide, you will learn:
How to Install Kali Linux on VirtualBox
You can install Kali Linux on a Virtual Box by using the following steps:
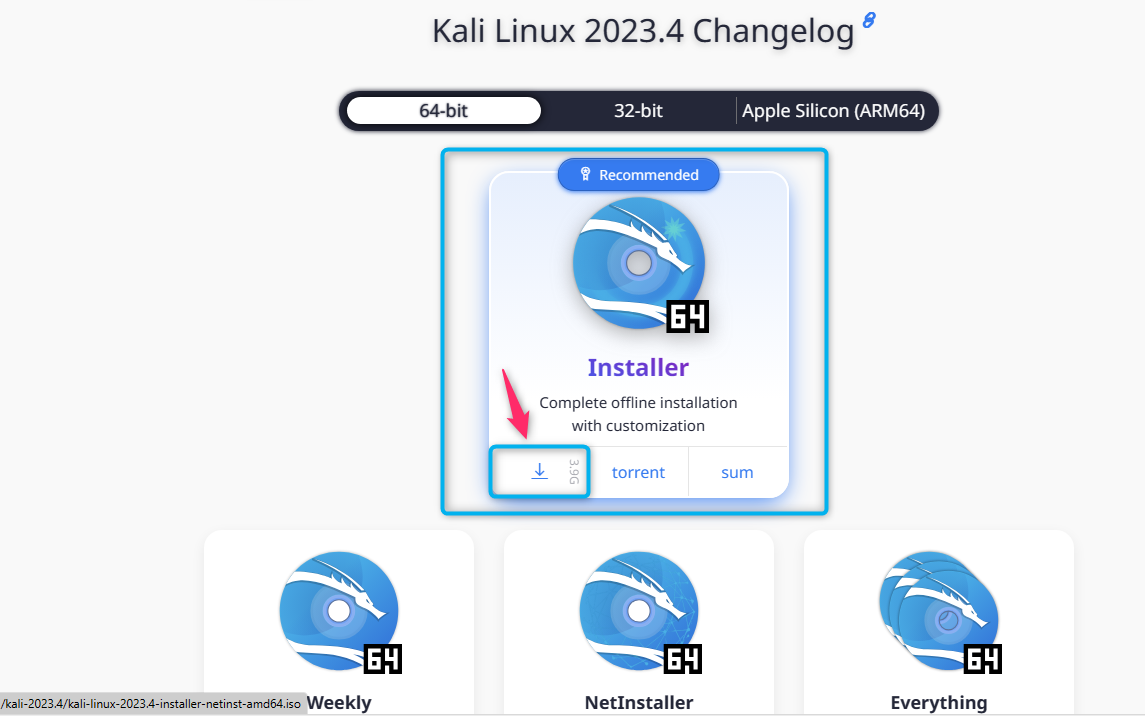
Step 1: First, navigate to Kali Linux official website and download the image file based on the system you want to install, either 32-Bit or 64-Bit. To download the image, simply choose the Download button:
Step 2: Now, download and install VirtualBox on PC from here. Ensure downloading the latest version of VirtualBox for an optimal performance.
Step 3: Now, open VirtualBox on your system and click on the New button:

Step 4: Set your Virtual machine name as Kali Linux, then, from the ISO Image option, navigate to Other section:

Step 5: Select your Kali Linux image file that you have downloaded in Step 1:

Step 6: Once all options are carefully selected, move forward by using the Next button:

Step 7: Select base memory (allocated RAM) and Processor (CPU Cores) for Kali Linux, you can increase or decrease the values by moving the drag handle in the right or left direction, respectively. Once done, don’t forget to click on the Next button:

Step 8: Now, create a virtual disk by selecting the Disk Size according to your choice. It can be done by moving the drag handle or providing the disk size inside the box, then choosing the Next button to move forward:
Step 9: Once the VirtualBox configuration is completed, use the Finish button:

Step 10: Now select Kali Linux and click on the Start button:

Step 11: Select the Graphical Install option at the Kali Linux installer menu:

Step 12: Select your preferred language for Kali Linux; I am going with the default one:

Step 13: Choose your location; I am going with the United States:

Step 14: Select the keyboard language; I am going with the default one, once selected, click on the Continue button:

Step 15: Choose your preferred hostname for your Kali Linux operating system, then select the Continue button:

Step 16: Choose your desired username for Kali Linux:

Step 17: Then provide full user account name for Kali Linux:

Step 18: Provide domain name or leave it empty, then select the Continue button:

Step 19: Choose a password for your current user on Kali Linux, you have to type the password multiple times for verification:

Step 20: Configure your clock by selecting your desired time zone:

Step 21: At the Partition disks menu, go with the default option that is Guided-use entire disk:

Step 22: Again, go with the default option and choose the Continue button to move forward:

Step 23: Choose the recommended option and select the Continue button afterwards:

Step 24: Select finish partitioning and write changes to the disk option, then choose the Continue button to move forward:

Step 25: Save changes to the disk by using the Yes option:

Step 26: Now choose your desktop environment and packages for Kali Linux, you can go with the default option or select them according to your choice:

The process will begin installing the required files needed to set up Kali Linux on VirtualBox:
Step 27: During the process, you will see the GRUB boot loader window, which you have to install by using the Yes option and then going with the Continue button:

Step 28: Choose the default location for GRUB boot loader or enter the device manually and select the location according to your choice:

Step 29: Once the Kali Linux installation completed, you can finish the installation using the Continue button:

After this step, the VirtualBox will reboot your system.
Step 30: Now login to Kali Linux on VirtualBox using the username and password that you set in the previous steps:

There you will see the Kali Linux desktop screen on VirtualBox, which confirms that the Kali Linux operating system is successfully installed:

How to Use Kali Linux on VirtualBox with Preinstalled VirtualBox Image
Besides installing Kali Linux on VirtualBox, you can also download the pre-installed VirtualBox image, which does not require installing and setting up the system from scratch. If you don’t want to use the time-consuming installation method, you can use the following steps to use Kali Linux on VirtualBox within a few minutes:
Step 1: First, you must download the Kali Linux VirtualBox image from the website:

Step 2: Once you downloaded the image, you have to extract the image files into a location of your choice.
Step 3: Now navigate to the Kali Linux extracted files folder and run the file using .vbox extension, this will load the Kali Linux on VirtualBox:

Step 4: Go to VirtualBox, select that Kali Linux VM machine and choose the Start button to run the system:

Step 5: Enter the default username and password as kali and click on the Log In button:

After this, you will be able to use Kali Linux on VirtualBox without performing any installation steps:

How to Enable Copy and Paste in Kali Linux on VirtualBox
You can enable copy and paste in Kali Linux on Debian 12 by simply going into the Devices section, then move towards Shared Clipboard and Drag and Drop options separately. For each option, you must enable the Bidirectional option:

Once done, reboot Kali Linux for the changes to take place.
Conclusion
VirtualBox is a powerful virtualization tool that you can use to install any operating system including Kali Linux. To install Kali Linux on VirtualBox, you must need an iso image file that can be downloaded from the official website. You can either download an iso file or directly use the preinstalled image to use Kali Linux on VirtualBox without installation. A complete step-by-step detail for each method is provided in the above section of this guide; using any of these two methods will help you install and run Kali Linux on VirtualBox.
By day, I am an engineer and researcher, building bridges and figuring out how the universe works. But when the clock strikes five, I turn into a wordsmith!
I write about my adventures on my blog, sharing tips and tricks to help others join the tech fun. I have worked on Raspberry Pi, Ubuntu, Debian, and Laptops. Right now, I have accepted the challenge of working on the Kali Linux system, and with my vast expertise in Linux systems, I will help users overcome the challenges through my blogs.